
I remember the days before xanthan gum was a known ingredient in gluten free baking. My mum and I used to call our gluten free pastry ‘patchwork’. It always tasted great, but it resembled an ancient ruin in structure and meant leakage was a common occurrence.
Fast forward a few innovative years, and xanthan gum came into our lives like a noughties hunk in a romcom and made everything dreamy. With this recipe, rolling your pastry out is no longer a swear-word inducing task and your liquid stays firmly in place.

This recipe is naturally gluten, oat, dairy, nut and booze free. It can be easily made dairy free and egg free with a few simple ingredient swaps.

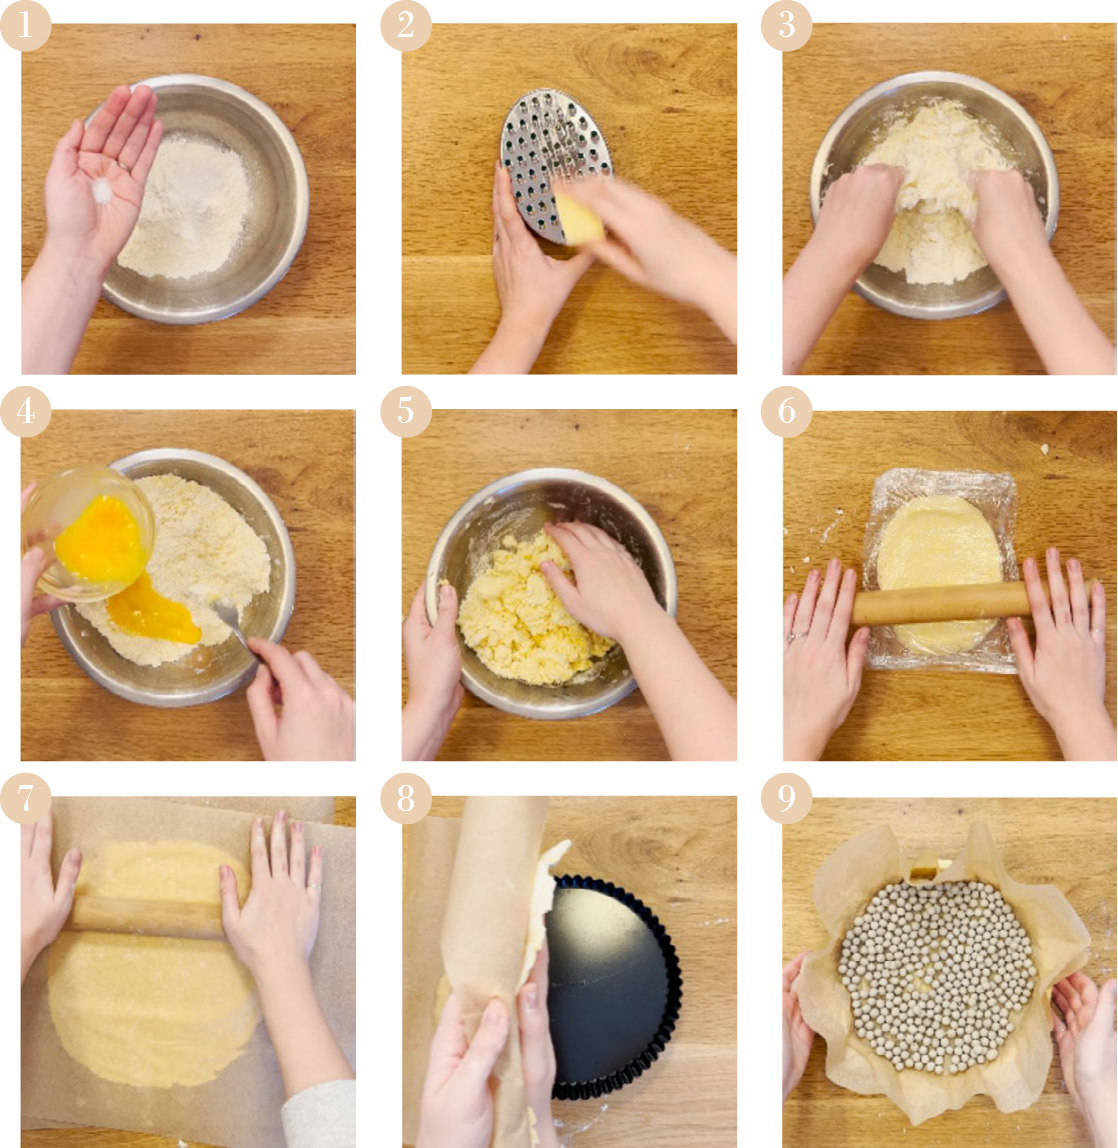
1. Add the xanthan gum and salt to the gluten free plain flour and mix well with a whisk.
2. Before grating the butter, ensure it is cold and hard, placing in the freezer for 5 minutes if needed. Using a cheese grater, grate the butter quickly to avoid it melting in your hands. If any melting has occurred, place back in the freezer for an additional five minutes.
3. Add the butter to the gluten free plain flour mixture and start to rub the butter into the gluten free flour until you have a large bread crumb consistency.
4. Beat both eggs together and add a quarter of the eggs to the pastry mixture. Use a fork to integrate the eggs. Repeat this until all of your eggs are mixed in and the pastry is starting to clump together.
5. Add one tablespoon of water at a time until the pastry can be pushed into a ball without any crumbling or loose flour.
6. Use your hands to form a single ball of dough and transfer to a sheet of clingfilm. Create a circular shape and fold the cling film over the pastry so it is airtight. Slightly roll out using a rolling pin before placing it in the fridge for 30 minutes. Heat the oven to 180c fan.
7. Once your pastry has cooled down, place it onto a sheet of floured baking paper with another sheet palace on top. Now your pastry is ready to roll out to the required size and thickness.
8. Carefully remove the top sheet of baking paper and use the base sheet of baking paper to help you flip the pastry onto your tart case.
9. Reuse the baking paper to place back into the tart case and generously fill with a weight. I use brown rice and add another layer of baking beads to really help the pastry keep its shape. Place in the oven to blind bake for 15 minutes. Then remove the baking weights, before placing back into the oven for an additional 15 minutes.
Depending on whether the purpose of your shortcrust pastry is for a desert for a dinner, use sugar or salt as appropriate.
If you are preparing the shortcrust pastry dough ahead of time, it will keep in the fridge tightly wrapped in clingfilm for one day before baking. Remember to allow it to come to room temperature before rolling.
Additionally, a baked tart shell will keep in an airtight container for one day before filling.

Did you try this recipe? Don’t forget to rate the recipe and leave a comment below. Want more free from bakes? Join me on Instagram for more free from recipe ideas.
Add the xanthan gum and salt to the gluten free plain flour and mix well with a whisk.
Before grating the butter, ensure it is cold and hard, placing in the freezer for 5 minutes if needed. Using a cheese grater, grate the butter quickly to avoid it melting in your hands. If any melting has occurred, place back in the freezer for an additional five minutes.
Add the butter to the gluten free plain flour mixture and start to rub the butter into the gluten free flour until you have a large bread crumb consistency.
Beat both eggs together and add a quarter of the eggs to the pastry mixture. Use a fork to integrate the eggs. Repeat this until all of your eggs are mixed in and the pastry is starting to clump together.
Add one tablespoon of water at a time until the pastry can be pushed into a ball without any crumbling or loose flour . I use Doves Freee From flour which requires all four tablespoons of cold water, however yours may need more or less depending on how absorbent the flour mixture is.
Use your hands to form a single ball of dough and transfer to a sheet of clingfilm. Create a circular shape and fold the cling film over the pastry so it is airtight. Slightly roll out using a rolling pin before placing it in the fridge for 30 minutes.
Heat the oven to 180c fan.
Once your pastry has cooled down (if in the fridge for over 30 minutes, allow it to come back to room temperature before rolling out), place it onto a sheet of floured baking paper with another sheet palace on top. Now your pastry is ready to roll out to the required size and thickness, which here is approximately 12 inches x 12 inches and one inch thickness.
Carefully remove the top sheet of baking paper and use the base sheet of baking paper to help you flip the pastry onto your tart case. Remove the baking paper and use your fingers to push the pastry into the tart case (delicate fingers needed here!). Keep some excess pastry to hang over the tart case to avoid the pastry from shrinking in the oven.
Reuse the baking paper to place back into the tart case and generously fill with a weight. I use brown rice and add another layer of baking beads to really help the pastry keep its shape.
Place in the oven to blind bake for 15 minutes. Then remove the baking weights, before placing back into the oven for an additional 15 minutes.
Allow your pastry to cool, and then use a curated knife to remove the excess pastry from the edges to create your neat tart case. Allow the pastry to completely cool before adding any filling.

In 2017 I joined the coeliac club and I knew that if I wanted to enjoy all the carby goodness I had been indulging in for 21 years, I needed to up my culinary game.
I created Lulu’s Free From to share recipes so, you too, can eat delicious food that doesn’t compromise on taste or texture and delivers on your dietary needs.